It2EDU

Tuesday, January 3, 2017


Bucket sort is a sorting algorithm also knows as bin sort,
it works with distributing elements of an array into a number of buckets. 


A bucket is most commonly a type of data buffer or a type of
document in which data is divided into regions. Elements or contents in the
bucket are unsorted and size of the bucket is fixed at the time of creation.


A bucket has states of empty, non-empty, full or partly
full, and overflows.


Each bucket is sorted individually, using any sorting
algorithm or bucket sorting.  Basically
bucket sort is distribution sort and it is cousin of radix sort. Bucket sort
can be implemented with comparisons and therefore can also be considered a
comparison sort algorithm. 


Worst – case performance:      O(n2)


Best Case Performance:  
        Ω(n+k)


Average Performance:            
 
θ(n+k)


Worst case space complexity:  O(n.k)


Pseudo code of Bucket sort:


function
bucketSort(array, n) is


  buckets ← new array of n empty lists


  for i = 0 to (length(array)-1) do


    insert array[i] into
buckets[msbits(array[i], k)]


  for i = 0 to n - 1 do


    nextSort(buckets[i]);


  return the concatenation of
buckets[0], ...., buckets[n-1]


Please look at the instance:


Given Series is: [34,12,45,23,1,3,4,36,19,20,28,56,67,48,59]


Distribute these elements into buckets/bins like below


Bucket Sort
Distribution of given Elements in Buckets


 In the above picture elements are distributed among the
bins/buckets


Bucket sort
Sorting in Each Bin


Elements are sorted in each bin/bucket.


Implement bucket sort in java:


import java.util.*;


public class BucketSort{


   public static void
sort(int[] a, int limit) {


      int [] bucket=new
int[limit+1];


      for (int i=0;
i<bucket.length; i++) {


         bucket[i]=0;


      }


      for (int i=0;
i<a.length; i++) {


bucket[a[i]]++;


      }


      int outPos=0;


      for (int i=0;
i<bucket.length; i++) {


         for (int j=0;
j<bucket[i]; j++) {


a[outPos++]=i;


         }


      }


   } 


   public static void
main(String[] args) {


      int limit=5;


      int [] data=
{5,3,0,2,4,1,0,5,2,3,1,4};


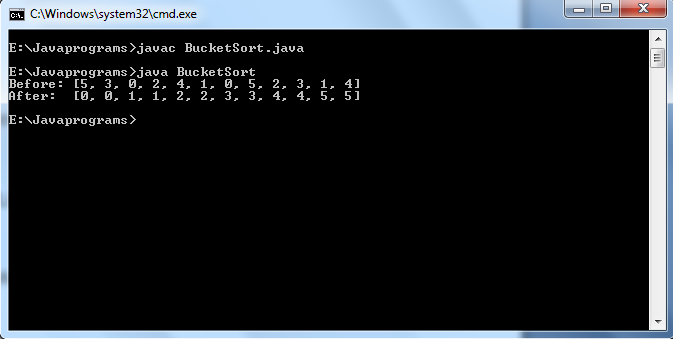
System.out.println("Before: " + Arrays.toString(data));


      sort(data,limit);


System.out.println("After: 
" + Arrays.toString(data));


   }


}


Out put of the above program is:


Sunday, December 25, 2016


Hadoop is run on Linux kernel. If you want to install Hadoop
on windows OS, Cygwin need to install in your machine.


Cygwin is creating linux like environment in windows. Here
is the link to get cygwin. https://cygwin.com/install.html


Hadoop can be installed in Multi Node cluster / single node
cluster. any one we choose.


In this blog I posted Installation of single node cluster in your machine on Linux
OS.


Step 1


Java is mandatory to run Hadoop so check whether
java is installed or not in your machine.

To check for
java


          $java –version


If you want to install Java in linux OS follow the below.


Step2:


$Sudo apt-get install
oracle-java8-installer


Step3:


Hadoop requires SSH access to manage its nodes, i.e. remote
machines plus your local machine where Hadoop runs. For single node cluster
need to configure SSH access to local host for user.


Generate a public key 


$ssh-keygen -t rsa -P ""


Then you have to enable access
to your local machine.


$cat ~/.ssh/id_rsa.pub >>
~/.ssh/authorized_keys


Step4:


Hadoop is free source from Apache software foundation go to
that site and down load the Hadoop latest version which suitable to your
machine.


Extract the downloaded tar file.


$tar xvfz hadoop-1.2.1.tar.gz


After extracting it do some following changes under Hadoop/conf.


Change 1:


Core-site.xml:


<configuration>


     <property>


<name>hadoop.tmp.dir</name>


          <value>TEMPORARY-DIR-FOR-HADOOPDATASTORE</value>


           <description>A base for other
temporary directories</description>


    </property>


    <property>


<name>fs.default.name</name>


<value>hdfs://localhost:54310</value>


    </property>


</configuration>


Change2:


Mapared-site.xml:


<configuration>


<property>


<name>mapred.job.tracker</name>


<value>localhost:54311</value>


</property>


</configuration>


Change3:


Hdfs-site.xml:


<configuration>


<property>


<name>dfs.replication</name>


          <value>1</value>


</property>


</configuration>


Step4:


Conf/slaves change to
localhost


Step5:


Conf/master change to
localhost


Step6:


Iit is essential to Setting up the environment
variables for Hadoop and Java


For Temporary set up run
the below command:


$export
JAVA_HOME=/usr/lib/jvm/jdk1.8.0


$export
HADOOP_COMMON_HOME=/home/hadoop/hadoop-install/hadoop-1.2.1


For permanent setting:


Open .bashrc and type end of the file append
the below lines.


To open bashrc


 $gedit ~/.bashrc


And type the below two
lines


$export
JAVA_HOME=/usr/lib/jvm/jdk1.8.0


$export
HADOOP_COMMON_HOME=/home/hadoop/hadoop-install/hadoop-1.2.1


Once done the above run
the below command.


$source ~/.bashrc


Step 7:


Format the Hadoop file
system in Hadoop directory.


$./bin/hadoop namenode –format


Step 8:


Running the cluster.


$./bin/start-all.sh


Step 9:


To stop the cluster.


$./bin/stop-all.sh